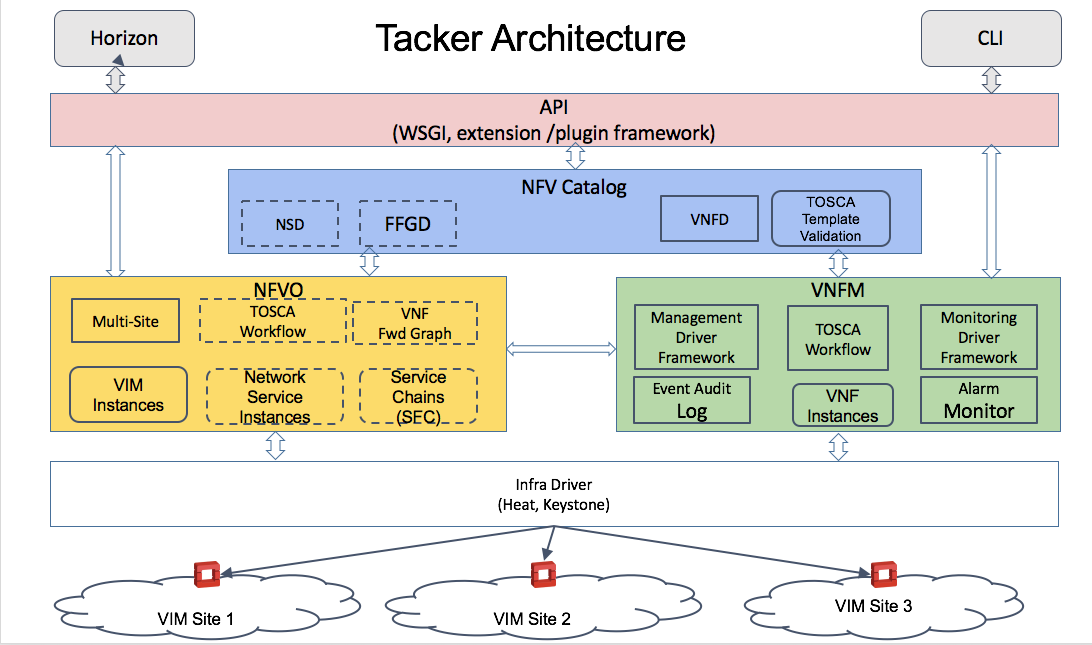
Tacker - OpenStack NFV Orchestration Tacker is an official OpenStack project building a Generic VNF Manager (VNFM) and a NFV Orchestrator (NFVO) to deploy and operate Network Services and Virtual Network Functions (VNFs) on an NFV infrastructure platform like OpenStack. It is based on ETSI MANO Architectural Framework and provides a functional stack to Orchestrate Network Services end-to-end using VNFs.
Tacker的部署 环境说明:
安装代码 1 2 3 4 5 6 7 8 9 10 11 12 13 [root@controller ~]# git clone -b stable/newton https://github.com/openstack/tacker.git [root@controller ~]# cd tacker/ [root@controller tacker]# pip install -r requirements.txt [root@controller tacker]# python setup.py install # 上述步骤完成后,检查下oslo依赖包的版本。oslo.config的版本最好与下面所示一致。(或不低于3.19.0) [root@controller ~]# pip list|grep -i oslo.config oslo.config (3.21.0) # 检查keystonemiddleware的版本,最好与下面所示一致。 [root@controller ~]# pip list|grep -i keystonemiddleware keystonemiddleware (4.10.0) [root@controller tacker]# mkdir -p /etc/tacker /var/log/tacker
生成配置文件 参考:https://docs.openstack.org/developer/tacker/install/manual_installation.html#installing-tacker-server
1 2 3 4 5 6 7 8 9 10 11 12 # 进入tacker源码目录 [root@netscaler tacker]# ./tools/generate_config_file_sample.sh [root@netscaler tacker]# cp -r etc/tacker/ /etc/ # 配置tacker.conf,要在keystone_authtoken session中添加以下参数项: [keystone_authtoken] admin_tenant_name = services admin_password = tacker admin_user = tacker auth_protocol = http identity_uri = http://{keystone_ip}:5000 auth_url = http://{keystone_ip}:35357
准备数据库 1 2 3 4 5 6 7 8 9 10 11 MariaDB [(none)]> create database tacker; Query OK, 1 row affected (0.01 sec) MariaDB [(none)]> grant all on tacker.* to tacker@'localhost' identified by 'tacker'; Query OK, 0 rows affected (0.04 sec) MariaDB [(none)]> grant all on tacker.* to tacker@'%' identified by 'tacker'; Query OK, 0 rows affected (0.00 sec) MariaDB [(none)]> flush privileges; Query OK, 0 rows affected (0.00 sec)
创建user & service & endpoint 1 2 3 4 5 6 7 8 9 10 11 12 13 14 15 16 17 18 19 20 21 22 23 24 25 26 27 28 29 30 31 32 33 34 35 [root@controller ~(keystone_admin)]# keystone user-create --name tacker --tenant services --pass tacker --enabled true +----------+----------------------------------+ | Property | Value | +----------+----------------------------------+ | email | | | enabled | True | | id | 5b61a259246f436894657e7b950b2467 | | name | tacker | | tenantId | e0b5c56b294d4c89b3d593b09166fcd1 | | username | tacker | +----------+----------------------------------+ [root@controller ~(keystone_admin)]# keystone service-create --type nfv-orchestration --name tacker --description "Tacker Service" +-------------+----------------------------------+ | Property | Value | +-------------+----------------------------------+ | description | Tacker Service | | enabled | True | | id | da24c187a9f74572bbc7e3ee674b9d71 | | name | tacker | | type | nfv-orchestration | +-------------+----------------------------------+ # 赋heat的使用权限 [root@controller ~(keystone_admin)]# keystone user-role-add --user 5b61a259246f436894657e7b950b2467 --role heat_stack_owner --tenant services [root@controller ~(keystone_admin)]# keystone endpoint-create --region RegionOne --service da24c187a9f74572bbc7e3ee674b9d71 --publicurl http://{tacker_ip}:9890 --adminurl http://{tacker_ip}:9890 --internalurl http://{tacker_ip}:9890 +-------------+----------------------------------+ | Property | Value | +-------------+----------------------------------+ | adminurl | http://{tacker_ip}:9890 | | id | dfb0530729964cb2b69e1665d002e728 | | internalurl | http://{tacker_ip}:9890 | | publicurl | http://{tacker_ip}:9890 | | region | RegionOne | | service_id | da24c187a9f74572bbc7e3ee674b9d71 | +-------------+----------------------------------+
初始化数据库 1 2 # 初始化tacker的数据库 [root@controller ~]# tacker-db-manage --config-file /etc/tacker/tacker.conf upgrade head
启动服务 1 2 3 4 5 6 7 8 9 10 11 12 13 14 15 16 17 18 19 [root@controller ~]# cat > /usr/lib/systemd/system/openstack-tacker-server.service << EOF > [Unit] > #Description=OpenStack Nova API Server > #After=syslog.target network.target > > [Service] > Type=notify > NotifyAccess=all > TimeoutStartSec=0 > Restart=always > User=root > > ExecStart=/usr/bin/tacker-server --config-file /etc/tacker/tacker.conf --log-file /var/log/tacker/tacker.log > > [Install] > WantedBy=multi-user.target > EOF [root@controller ~]# systemctl start openstack-tacker-server
Tacker的使用 依次创建VIM & VNFD & VNF 创建VIM,先写一个config.yaml,内容如下,变量根据实际情况替换:
1 2 3 4 5 6 7 8 9 10 11 12 13 14 15 16 17 18 19 20 21 22 23 24 25 26 [root@controller ~(keystone_admin)]# cat > /root/config.yaml << EOF > auth_url: http://$KEYSTONE_IP:5000/v2.0 > username: $TACKER_USER > password: $TACKER_PASSWORD > project_name: $PROJECT_NAME > EOF [root@controller ~(keystone_admin)]# tacker vim-register --is-default --config-file config.yaml test_vim Created a new vim: +----------------+-----------------------------------------------------------------------------------------------------------------------------------+ | Field | Value | +----------------+-----------------------------------------------------------------------------------------------------------------------------------+ | auth_cred | {"username": $username, "tenant_id": "", "password": $password, "auth_url": $auth_url, "tenant_name": $project_name} | | auth_url | $auth_url | | created_at | 2017-02-07 18:29:58.040460 | | description | | | id | d64301b4-bfcd-4033-95cf-e5bc95974825 | | is_default | True | | name | test_vim | | placement_attr | {"regions": ["RegionOne"]} | | status | REACHABLE | | tenant_id | 058ad720c0bc4cd496e1e0462cdd1ac8 | | type | openstack | | updated_at | | | vim_project | {"project_domain_name": "", "id": "", "name": $project_name} | +----------------+-----------------------------------------------------------------------------------------------------------------------------------+
创建VNFD,即vnf集合的描述文件,此处的test_vnfs.yaml为模板文件,以下有详细介绍:
1 [root@controller ~(keystone_admin)]# tacker vnfd-create --vnfd-file ./test_vnfs.yaml test_vnfd
创建VNF:
1 [root@controller ~(keystone_admin)]# tacker vnf-create --vnfd-name test_vnfd --vim-name test_vim test_vnf
VNFD模板详解
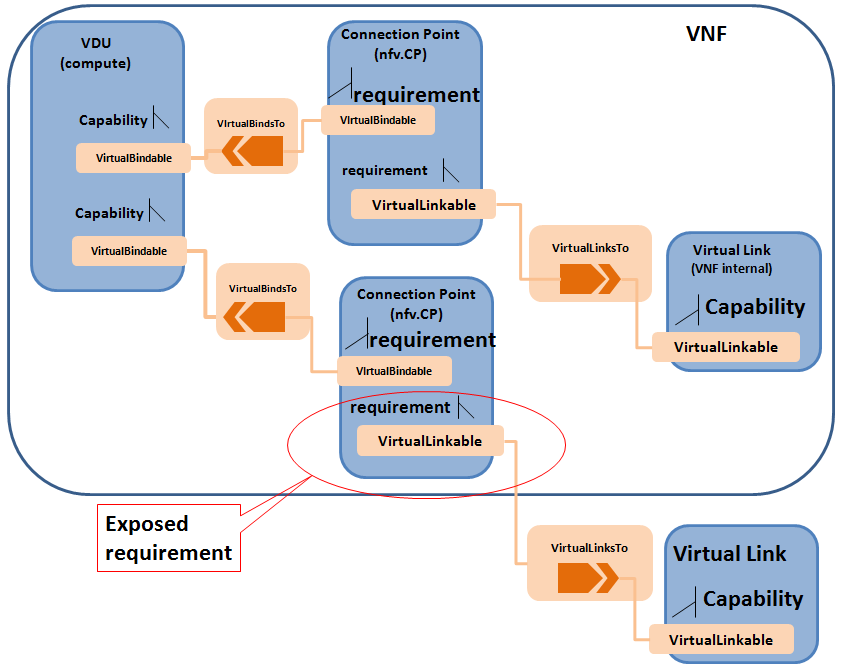
1 2 3 4 5 6 7 8 9 10 11 12 13 14 15 16 17 18 19 20 21 22 23 24 25 26 27 28 29 30 31 32 33 34 35 36 37 38 39 40 41 42 43 44 45 46 47 48 49 50 51 52 53 54 55 56 57 58 59 60 61 62 # tosca版本信息描述 tosca_definitions_version: tosca_simple_profile_for_nfv_1_0_0 # 模板描述 description: test vnfd metadata: template_name: test_vnf # vnfd拓扑结构 topology_template: # 传入参数信息,需要结合环境变量文件传入,具体可以参考tacker vnf-create命令的说明 inputs: cp1_mgmt_ip: type: string # 表示node的拓扑结构模板 node_templates: # 此处定义了一个vdu,对应openstack中的虚拟机,即nfv设备;VDU1是自定义的名字 VDU1: # vdu的type type: tosca.nodes.nfv.VDU.Tacker # 定义虚拟机的能力,如cpu、内存、磁盘等参数 capabilities: nfv_compute: properties: num_cpus: 1 mem_size: 2048 MB disk_size: 200 GB # 定义其他属性,如镜像、镜像的管理驱动(用于在虚拟机内部做配置)等 properties: image: cirros # tacker已集成的一个mgmt_driver是openwrt,后面会有介绍 mgmt_driver: noop # 此处定义了一个cp,Connection Point,对应openstack中的neutron port;CP1_MGMT是自定义的名字 CP1_MGMT: # cp的type type: tosca.nodes.nfv.CP.Tacker # 网卡的属性,可以定义网卡顺序、ip地址等 properties: management: true order: 0 anti_spoofing_protection: false # 可以指定ip地址,不写则表示根据dhcp分配 ip_address: {get_input: cp1_mgmt_ip} # 此处表示了与CP相连的节点和之间的连接关系,即一个网卡将出自哪个网络,以及将要绑定至哪个虚拟机 requirements: # vl侧接上了VL1 - virtualLink: node: VL1 # vb侧接上了VDU1 - virtualBinding: node: VDU1 # 此处定义了一个vl,Virtual Link,对应openstack中的neutron network;VL1是自定义的名字 VL1: type: tosca.nodes.nfv.VL # 网络的属性,名字、提供者等 properties: network_name: net_mgmt vendor: Tacker
Tacker VNF scale 参考:https://docs.openstack.org/developer/tacker/devref/scale_usage_guide.html
1 2 3 4 5 6 7 8 9 10 11 12 13 14 15 16 17 18 19 20 # 定义策略,此节点与node_templates同级 policies: # 此处定义了一个scale策略;SP1为自定义的名字 - SP1: # scale策略的type type: tosca.policy.tacker.Scaling # 定义了策略的详细内容 properties: # 每次伸缩的数量 increment: 1 # 下一次操作的冷却时间 cooldown: 0 # 总量的下限 min_instances: 1 # 总量的上限 max_instances: 3 # 初始的数量 default_instances: 2 # 要伸缩的目标,vdu、cp均可伸缩 targets: [VDU1]
重新定义了vnfd后,根据此vnfd创建vnf,之后即可以执行以下命令进行伸缩操作(out表示扩展,in表示收缩):
1 [root@controller ~(keystone_admin)]# tacker vnf-scale --vnf-name test_vnf --scaling-policy-name SP1 --scaling-type out
Tacker 与 Mistral 参考:https://docs.openstack.org/developer/tacker/devref/mistral_workflows_usage_guide.html Mistral部署与使用
Tacker 与 openwrt 1 2 3 4 5 6 7 8 9 10 11 12 VDU1: type: tosca.nodes.nfv.VDU.Tacker capabilities: nfv_compute: properties: num_cpus: 1 mem_size: 2048 MB disk_size: 200 GB properties: image: cirros # 使用openwrt mgmt_driver: openwrt
模板可以参考:https://github.com/openstack/tacker/blob/master/samples/tosca-templates/vnfd/tosca-vnfd-openwrt.yaml https://github.com/openstack/tacker/blob/master/samples/tosca-templates/vnfd/tosca-config-openwrt-with-firewall.yaml
1 [root@controller ~(keystone_admin)]# tacker vnf-create --vnfd-name test_vnfd --vim-name test_vim --config-file *** test_vnf
这里可以看下tacker中的mgmt_driver:
1 2 3 4 5 6 7 8 9 10 11 12 13 14 15 16 17 18 19 20 21 22 23 24 25 26 27 28 29 30 31 32 33 34 35 36 37 38 39 40 41 42 43 44 45 46 47 48 49 50 51 @log.log def _config_service (self, mgmt_ip_address, service, config ): user = cfg.CONF.openwrt.user password = cfg.CONF.openwrt.password try : cmd = "uci import %s; /etc/init.d/%s restart" % (service, service) LOG.debug(_('execute command: %s' ), (cmd)) commander = cmd_executer.RemoteCommandExecutor(user, password, mgmt_ip_address) commander.execute_command(cmd, input_data=config) except Exception as ex: LOG.error(_("While executing command on remote: %s" ), ex) raise exceptions.MgmtDriverException() @log.log def mgmt_call (self, plugin, context, vnf, kwargs ): if (kwargs[mgmt_constants.KEY_ACTION] != mgmt_constants.ACTION_UPDATE_VNF): return dev_attrs = vnf.get('attributes' , {}) mgmt_url = jsonutils.loads(vnf.get('mgmt_url' , '{}' )) if not mgmt_url: return vdus_config = dev_attrs.get('config' , '' ) config_yaml = yaml.load(vdus_config) if not config_yaml: return vdus_config_dict = config_yaml.get('vdus' , {}) for vdu, vdu_dict in vdus_config_dict.items(): config = vdu_dict.get('config' , {}) for key, conf_value in config.items(): KNOWN_SERVICES = ('firewall' , ) if key not in KNOWN_SERVICES: continue mgmt_ip_address = mgmt_url.get(vdu, '' ) if not mgmt_ip_address: LOG.warning(_('tried to configure unknown mgmt ' 'address %s' ), vdu) continue self._config_service(mgmt_ip_address, key, conf_value)
按照openwrt mgmt_driver的原理,可以写一个自定义的driver用来管理非openwrt镜像的vdu。
参考